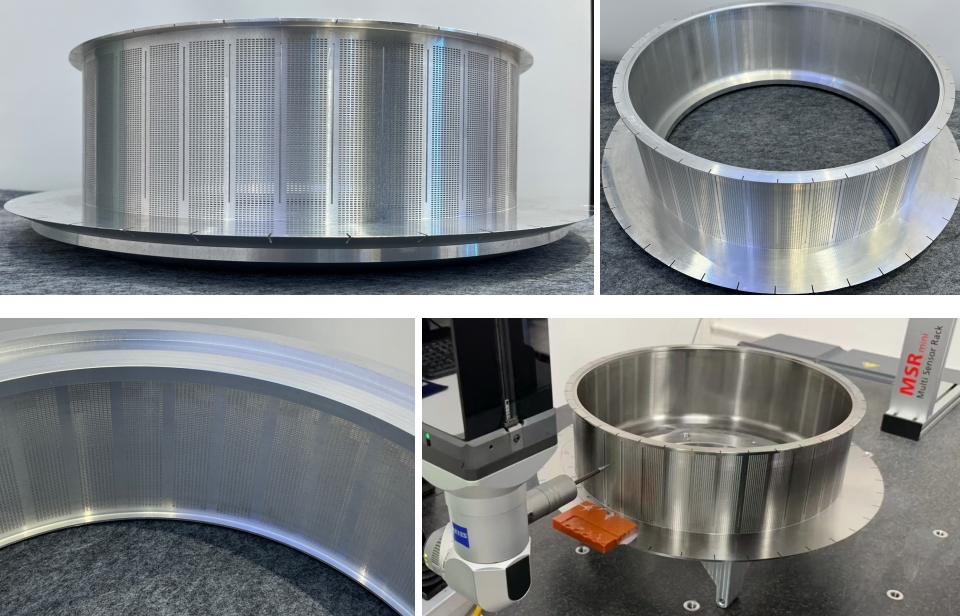
Customer Q: help me analyze the machining process of this part, the material is aluminum alloy 6061 and titanium alloy TC4, the two materials are processed 1 piece, the maximum diameter of the part size of 600mm, height of 260mm, wall thickness of 2.5mm, there are 12,000 small square holes, square holes size is 3.2 × 1.8mm, the surface of the refined degree Ra0.2, need to be deburred, you think that the ideal machining process for this part is what? What do you think is the ideal machining process for this part, and how long is the machining time (analyzed separately for two materials), thank you!
I'd be happy to analyze this highly precise and complex component for you. Based on the images, this is a typical thin-walled, flanged, and densely perforated rotational part, commonly used in high-end industrial equipment for filtration, separation, or fluid control.
This is an extremely challenging manufacturing task, especially when working with titanium alloy. Below is a detailed analysis of the ideal manufacturing process and estimated machining time for both materials.
Analysis of Common Challenges for the Component
1. Large Dimensions & Thin-Walled Structure: The maximum diameter is 600mm and the height is 260mm, and the thickness is 2.5mm, yet the cylindrical wall with the micro-holes is relatively thin. During machining, especially under high-speed rotation and cutting forces, the part is highly susceptible to vibration and deformation (tool/workpiece deflection). This can compromise dimensional accuracy (roundness, cylindricity) and surface quality.
2. 12,000 Micro Rectangular Holes: This is the single greatest manufacturing challenge. The quantity of holes is massive, their size is small (3.2×1.8mm), and they are rectangular, not circular. Traditional drilling is not an option; a special process is required. The significant internal stress released during the creation of these holes can cause the entire component to deform.
3. High Raw Material Cost: The cost of large-diameter 6061 aluminum bar/forging, and especially a titanium forging, is very high. Therefore, a "first-time-right" approach is essential, as any machining error would result in a substantial financial loss.
4. Deburring: 12,000 holes mean at least 24,000 edges that need to be treated. Burrs on the inner surface of the cylinder are particularly difficult to remove and will be a critical factor in the final quality of the part.
1. Aluminum Alloy (6061-T6) Process and Time Analysis
Aluminum alloy 6061 has good machinability, making it relatively easier to work with, but a rigorous process plan is still necessary to ensure final precision.
Ideal Manufacturing Process Flow
1. Material Preparation:
○ First Choice: Use a Forging. For a part of this size and shape, a forging provides a denser material grain structure, reduces internal stresses, and offers better dimensional stability during subsequent machining.
○ Alternative: Use a solid round bar stock. However, this results in significant material waste and higher internal stress.
2. Rough & Semi-Finish Machining (CNC Turning):
○ Use a large, high-rigidity CNC lathe. Follow the principle of "machine inside first, then outside; rough first, then finish."
○ Process: First, grip the outer diameter (OD) to machine the inner diameter (ID), face, and top chamfer, leaving a finishing allowance. Then, reverse the part and use custom fixtures (soft jaws) to grip the finished ID while machining the OD, flange, and the index marks on the flange.
○ Key: Leave a substantial allowance on the thin-walled section (e.g., 3-5mm per side) to counteract deformation in later stages.
3. Heat Treatment (Stress Relieving):
○ Perform a stress relief annealing process before finish machining. This step is critical for ensuring final dimensional stability by releasing most of the internal stress induced during roughing.
4. Finish Machining (CNC Turning):
○ Using new, sharp cutting tools with a smaller depth of cut and appropriate feed rates, machine all internal and external surfaces and the flange to their final dimensions and surface finish requirements. This is the last turning operation before creating the holes.
5. Micro Hole Machining (The Core Process):
○ Optimal Method: 5-Axis Laser Cutting
■ Reason: Laser cutting is a non-contact process. It exerts no cutting forces, preventing deformation of the thin wall. It is fast, highly accurate, produces clean edges, and has a small heat-affected zone. For rectangular holes, it is the perfect one-shot solution. This is the best choice considering efficiency, quality, and cost.
■ Equipment: Requires a large 5-axis laser machining center to ensure precise cutting on a cylindrical surface.
○ Alternative Method: High-Speed CNC Milling
■ Reason: If a laser is unavailable, a small vertical or horizontal machining center with a high-speed spindle and a micro endmill (e.g., Φ1.5mm) can be used.
■ Drawbacks: Extremely time-consuming, as each hole requires tool interpolation milling. This leads to rapid tool wear and a high risk of tool breakage. Cutting forces, though small, still exist, necessitating a very precise support fixture inside the cylinder to prevent vibration and deformation.
6. Deburring and Surface Finishing:
○ Deburring: Electrochemical Machining (ECM) or Abrasive Flow Machining (AFM) are ideal methods. They can efficiently and uniformly remove burrs from internal and intersecting holes. Manual deburring is practically unfeasible.
○ Surface Treatment: Anodizing can be performed as required to increase surface hardness and corrosion resistance.
Machining Time Estimation (Aluminum Alloy)
● CNC Turning (Rough + Finish): Including setup, programming, and machining, this is estimated at 16 - 24 hours.
● Heat Treatment: Multiple vacuum annealing cycles are needed, each requiring hours for ramp-up, hold, and cool-down. Total cycle time is approx. 15 - 25 hours (this is non-machining time but is part of the required lead time).
● Hole Machining (Using Laser Cutting): Cutting and travel time per hole is approx. 1.5-2 seconds. 12,000 × 2s = 24,000s ≈ 7 hours.
● Hole Machining (Using CNC Milling): Milling time per hole is approx. 20-30 seconds. 12,000 × 25s = 300,000s ≈ 83 hours. (This clearly shows the inefficiency of the milling approach).
● Deburring & Finishing: Approx. 4 - 8 hours.
Total Estimated Time (Ideal Process - Laser Cutting Ra1.6): 24 + 7 +25+ 8 = Approx. 64 hours
Total Estimated Time (Alternative - CNC Milling Ra0.2): 24 + 83 + 25+8 = Approx. 140 hours
2. Titanium Alloy (e.g., TC4/Ti-6Al-4V) Process and Time Analysis
Titanium alloy is a classic difficult-to-machine material. Its high strength, low thermal conductivity, and high chemical reactivity make it far more challenging and costly to machine than aluminum.
Ideal Manufacturing Process Flow
The process flow is similar to that for aluminum, but the requirements at every stage are far more stringent.
1. Material Preparation:
○ Forging is mandatory. Machining titanium from bar stock is not only incredibly wasteful but also results in non-uniform material structure and extreme internal stresses, which can easily lead to part failure.
2. Rough/Finish Machining (CNC Turning):
○ Core Principle: "Low speed, high feed rate, and high-pressure coolant."
○ Cutting Speed: Must be significantly reduced (often 1/4 to 1/5 that of steel).
○ Tooling: Use specialized carbide inserts designed for titanium, with specific coatings and geometries. Tool wear is extremely rapid, requiring frequent replacement to maintain quality.
○ Coolant: High-pressure, through-spindle coolant is essential. The coolant must be delivered at very high pressure directly to the cutting zone to prevent heat from rapidly destroying the tool and causing work hardening of the part surface.
○ Deflection/Deformation: Titanium has a lower modulus of elasticity, making deformation a more severe problem than with aluminum. More conservative cutting parameters and more robust fixturing are required.
3. Heat Treatment (Stress Relieving):
○ This is a mandatory step. Multiple rounds of vacuum stress relief annealing are typically required after roughing and semi-finishing to maximally eliminate machining stresses and prevent the part from deforming ("moving on its own") in later stages.
4. Micro Hole Machining:
○ The only realistic option: 5-Axis Laser Cutting
■ Reason: Milling these micro-holes in titanium is commercially unviable. Tool life might be measured in minutes, the risk of tool breakage is extremely high, and the cost and time would be astronomical. Laser cutting, as a non-contact method, perfectly bypasses these issues.
■ Requirements: A more powerful fiber laser is needed, along with an inert assist gas (like Argon, Ar) to prevent oxidation of the cut edge and ensure quality. The cutting speed will be slower than with aluminum.
○ Unsuitable Methods: CNC Milling, Waterjet Cutting (insufficient efficiency and precision), EDM (also extremely slow).
5. Deburring:
○ Titanium burrs are tough and tenacious, making them very difficult to remove. Electrochemical Machining (ECM) is the most effective method. Manual deburring is largely ineffective.
Machining Time Estimation (Titanium Alloy)
● CNC Turning (Rough + Finish): Due to extremely slow cutting speeds, frequent tool changes, and more complex processes, the time is about 3-4 times that of aluminum. Estimated at 60 - 80 hours.
● Heat Treatment: Multiple vacuum annealing cycles are needed, each requiring hours for ramp-up, hold, and cool-down. Total cycle time is approx. 15 - 25 hours (this is non-machining time but is part of the required lead time).
● Hole Machining (Using Laser Cutting): Laser cutting titanium is slower and requires stricter parameter control. Each hole will take about 3-4 seconds. 12,000 × 3.5s = 42,000s ≈ 12 hours.
● Hole Machining (Using CNC Milling): Milling time per hole is approx. 50-60 seconds. 12,000 × 55s = 660,000s ≈ 183 hours. (This clearly shows the inefficiency of the milling approach).
● Deburring & Finishing: More difficult and time-consuming. Approx. 8 - 12 hours.
Total Estimated Time (Process - Laser Cutting Ra1.6): 80 + 25+12 + 12= Approx. 129 hours.
Total Estimated Time (Process – 5axis CNC Milling Ra0.2): 80 +25+ 183 + 12 = Approx. 300 hours
Summary and Recommendations
Item | Aluminum Alloy (6061) | Titanium Alloy (TC4) | Notes |
Core Process | CNC Turning + 5-Axis Laser Cutting | CNC Turning + 5-Axis Laser Cutting | Laser cutting is key to ensuring quality and efficiency(Ra1.6). |
Material Prep | Forging preferred, stress relief required | Forging mandatory, multiple vacuum anneals | Material treatment is vital for final dimensional stability. |
Machining | Relatively easy, high-speed capable | Extremely difficult: low speed, high feed, HP coolant | Places extreme demands on machine rigidity, tooling, and coolant. |
Est. Machining Time | ~64 hours | ~129 hours | Titanium takes roughly 3 times longer to machine. |
Difficulty Level | ★★★☆☆ (High) | ★★★★★ (Extremely High) | The titanium part is a top-tier machining challenge. |
Recommendations for You:
● It is crucial to find a machine shop with extensive experience in the Automotive or precision medical device sectors. They typically have the expertise to machine large, thin-walled components and titanium alloys, and they will own high-end equipment like 5-axis laser cutters.
● When requesting quotes and discussing technical details, be sure to insist on stress relieving and laser cutting(if roughness was not request high) as key process steps. If a potential supplier plans to mill these holes on a conventional machine, you should be extremely cautious about their capabilities and delivery timeline.
● Be prepared for a very high price quote for this component. This is not just due to the long machining hours, but also because it demands the highest level of equipment, technical skill, experience, and risk management.
I hope this detailed analysis is helpful to you!
What Zhihui Precision did?
Finally we got this order and made 2 parts for each material.
And we made the 12000small holes by 5axis CNC machining since customer asked the roughness Ra0.2, the laser cutting process cannot reach it.
Precision-machined using our 5-axis CNC technology, this product overcomes multiple technical challenges:
- Effectively controls roundness deformation in thin-wall structures through 5-axis synchronized precision machining
- Achieves zero deviation in processing thousands of holes via high-precision positioning systems and proven techniques
- Optimizes cutting parameters and toolpath planning to balance efficiency and quality in thin-wall machining
Demonstrating professional reliability in complex component manufacturing, our advanced 5-axis CNC technology fully showcases our technical capabilities in precision part machining.
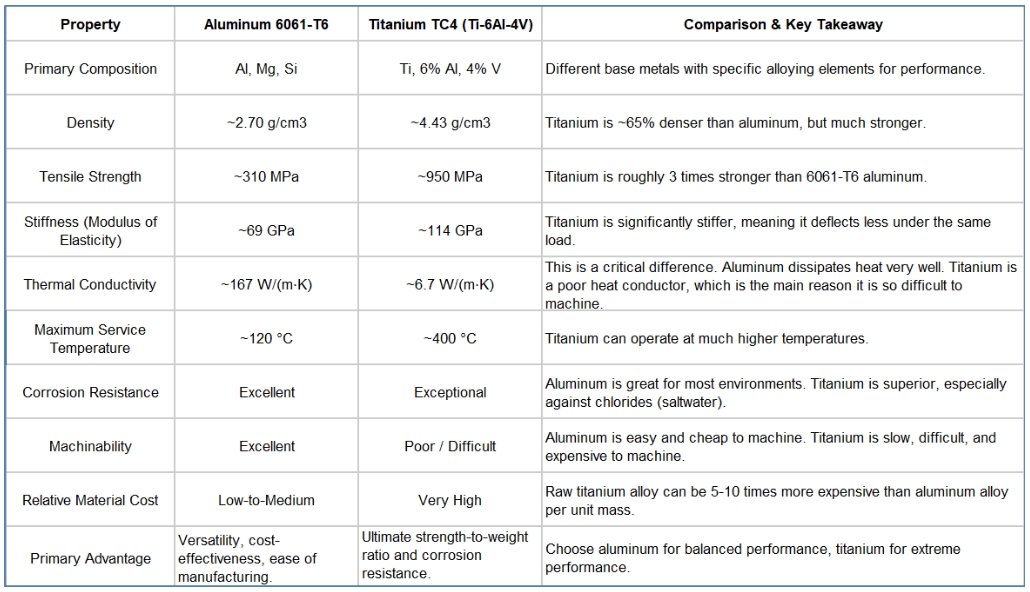
Material Properties of Aluminum 6061 & Titanium TC4 For Reference.
 English
 Deutsch
 Español
 français
 日本語
日本語 русский
 한국어
한국어 italiano
 português
 العربية
 Türkçe
 中文
中文